
From Practice Intelligence, navigate to 'Settings'.


Select Office
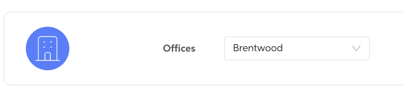
Toggle between multiple office locations to adjust settings for a specific site. This ensures each location’s preferences are saved and applied independently.
Set X-ray Intervals
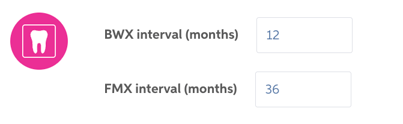
Choose the interval at which you’d like to receive alerts for Bitewing (BWX) or Full Mouth X-rays (FMX) that are due.
-
The system checks the patient’s account or ledger history for the last X-ray date.
-
An alert is triggered if the set timeframe has passed.
Pathology Detection Preferences
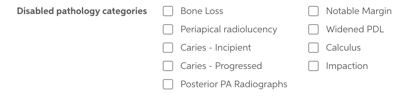
Default Pathology Display Settings:
Enable or disable visibility for the following by default:
- Periapical Radiolucencies
- Caries
- Notable Margins
- Calculus
(Note: If any of these options are marked in blue, they are disabled and will not appear on X-rays.)
Default Bone Measurement Display
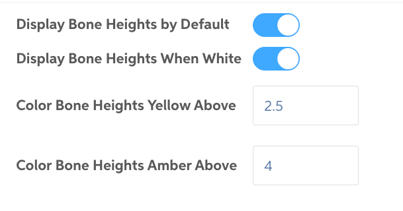
Control how bone measurement data appears on images:
- Default Bone Measurement Display:
Enable or disable the automatic display of bone measurements on images. - Bone Levels When White:
Choose whether to show bone level lines when they're within the normal (white) range. Disabling this can reduce on-screen noise and highlight only concerning (yellow or orange) values. - Measurement Threshold Settings:
Customize the threshold at which bone measurements turn yellow or amber-orange to indicate concern.
Treatment Prices
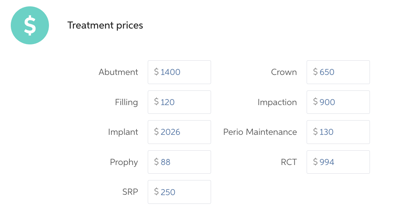
Enter average fees for procedures to gain insights into the potential value of AI-detected opportunities. This can help identify treatment opportunities and estimate revenue impact.
Set Global Enhanced View Level
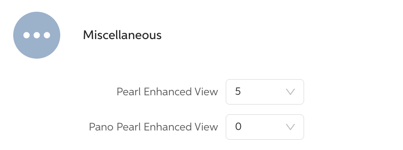
Select a preferred enhanced image viewing level to apply across all workstations for your office. This setting eliminates the need to configure each workstation individually and ensures a consistent viewing experience for your entire team.